A single misstep during machine maintenance can lead to catastrophic injury. That’s why lockout tagout (LOTO) exists — to physically isolate energy sources and ensure equipment stays de-energized during service. But policies and procedures mean little if workers don’t recognize what proper LOTO looks like in practice. That’s where pictures of lockout tagout come in.
Unlike abstract safety manuals, visual examples show exactly how locks, tags, hasps, and group isolation devices are applied — and where real-world mistakes happen. This guide delivers a clear, image-driven understanding of LOTO, using realistic scenarios, common setup errors, and visual best practices that reflect actual industrial environments.
Why Lockout Tagout Pictures Matter
Words alone can’t capture the complexity of a multi-energy isolation on a conveyor system or a chemical valve bank. Workers need to see how a lock is placed, where tags are affixed, and what a properly secured circuit breaker looks like.
Visual references serve three critical functions:
- Training: New employees grasp procedures faster with annotated images.
- Compliance verification: Safety auditors compare real setups to documented visual standards.
- Error prevention: Photos reveal subtle but dangerous oversights — like a missing valve lock or a tag without a name.
For example, a picture showing a worker applying a lock to a hydraulic power unit’s disconnect switch — with a tag clearly stating their name, department, and reason — reinforces accountability better than any written rule.
Common LOTO Scenarios in Practice
Effective lockout tagout pictures aren’t staged perfection. The best ones reflect real conditions: cramped panels, multiple energy sources, and team-based maintenance. Below are the most frequently documented LOTO situations — and what to look for in each.
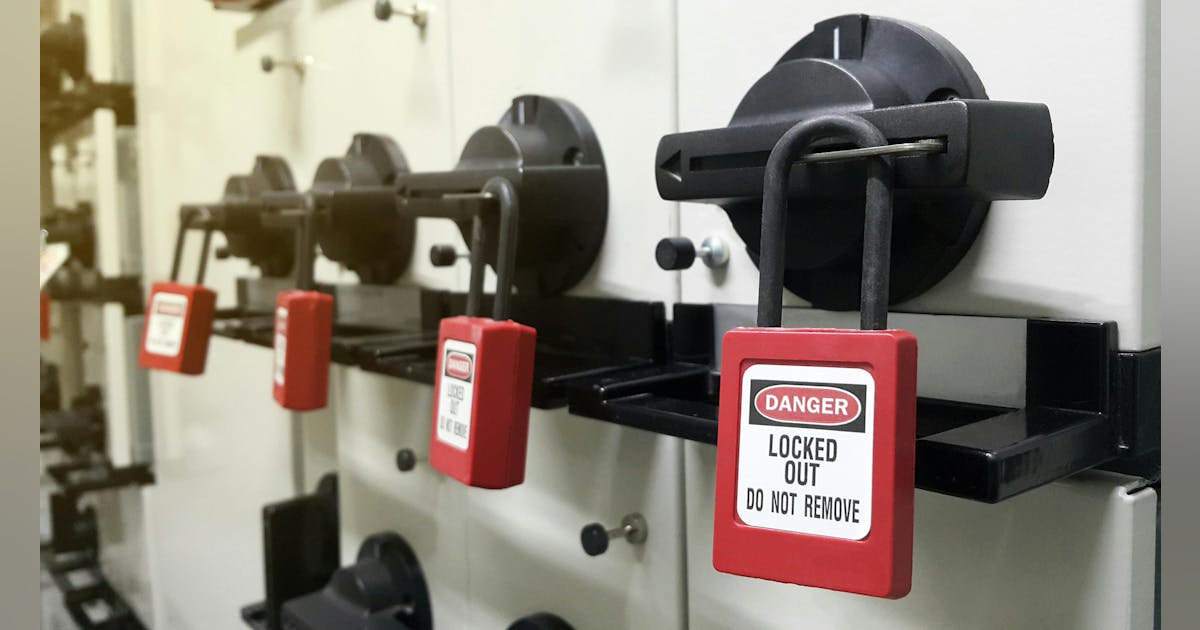
Electrical Isolation This is the most common LOTO scenario. A typical picture shows a circuit breaker locked in the “OFF” position with a lockout hasp and individual worker locks.
Key visual cues: - Locks are personal, identifiable, and non-releasable under power. - Tags are filled out completely — name, date, purpose. - The disconnect is clearly labeled as part of the LOTO procedure.
A common mistake seen in real photos: workers tagging but not locking the breaker, assuming the tag alone provides protection. OSHA requires physical isolation — the tag is only a warning.
Pneumatic and Hydraulic Systems
Machines powered by air or fluid pressure require more than electrical isolation. A compliant LOTO picture will show: - Manual bleed valves opened and locked in the open position. - Pressure gauges reading zero. - Locks on isolation valves for compressed air or hydraulic lines.
Example: In a stamping press maintenance photo, two locks appear on the main air supply valve, and a bleed port is open with a tag confirming pressure release. Without this, stored energy could cause sudden movement.
Mechanical Energy Isolation
Springs, flywheels, and suspended loads store mechanical energy. A proper LOTO image in this context shows physical restraints — like pins, blocks, or brackets — in place and locked.
For instance, a photo of a crane undergoing service should show a locking pin securing the hoist mechanism, with a tag stating that movement is prevented. Without visual confirmation, it’s impossible to verify safety.
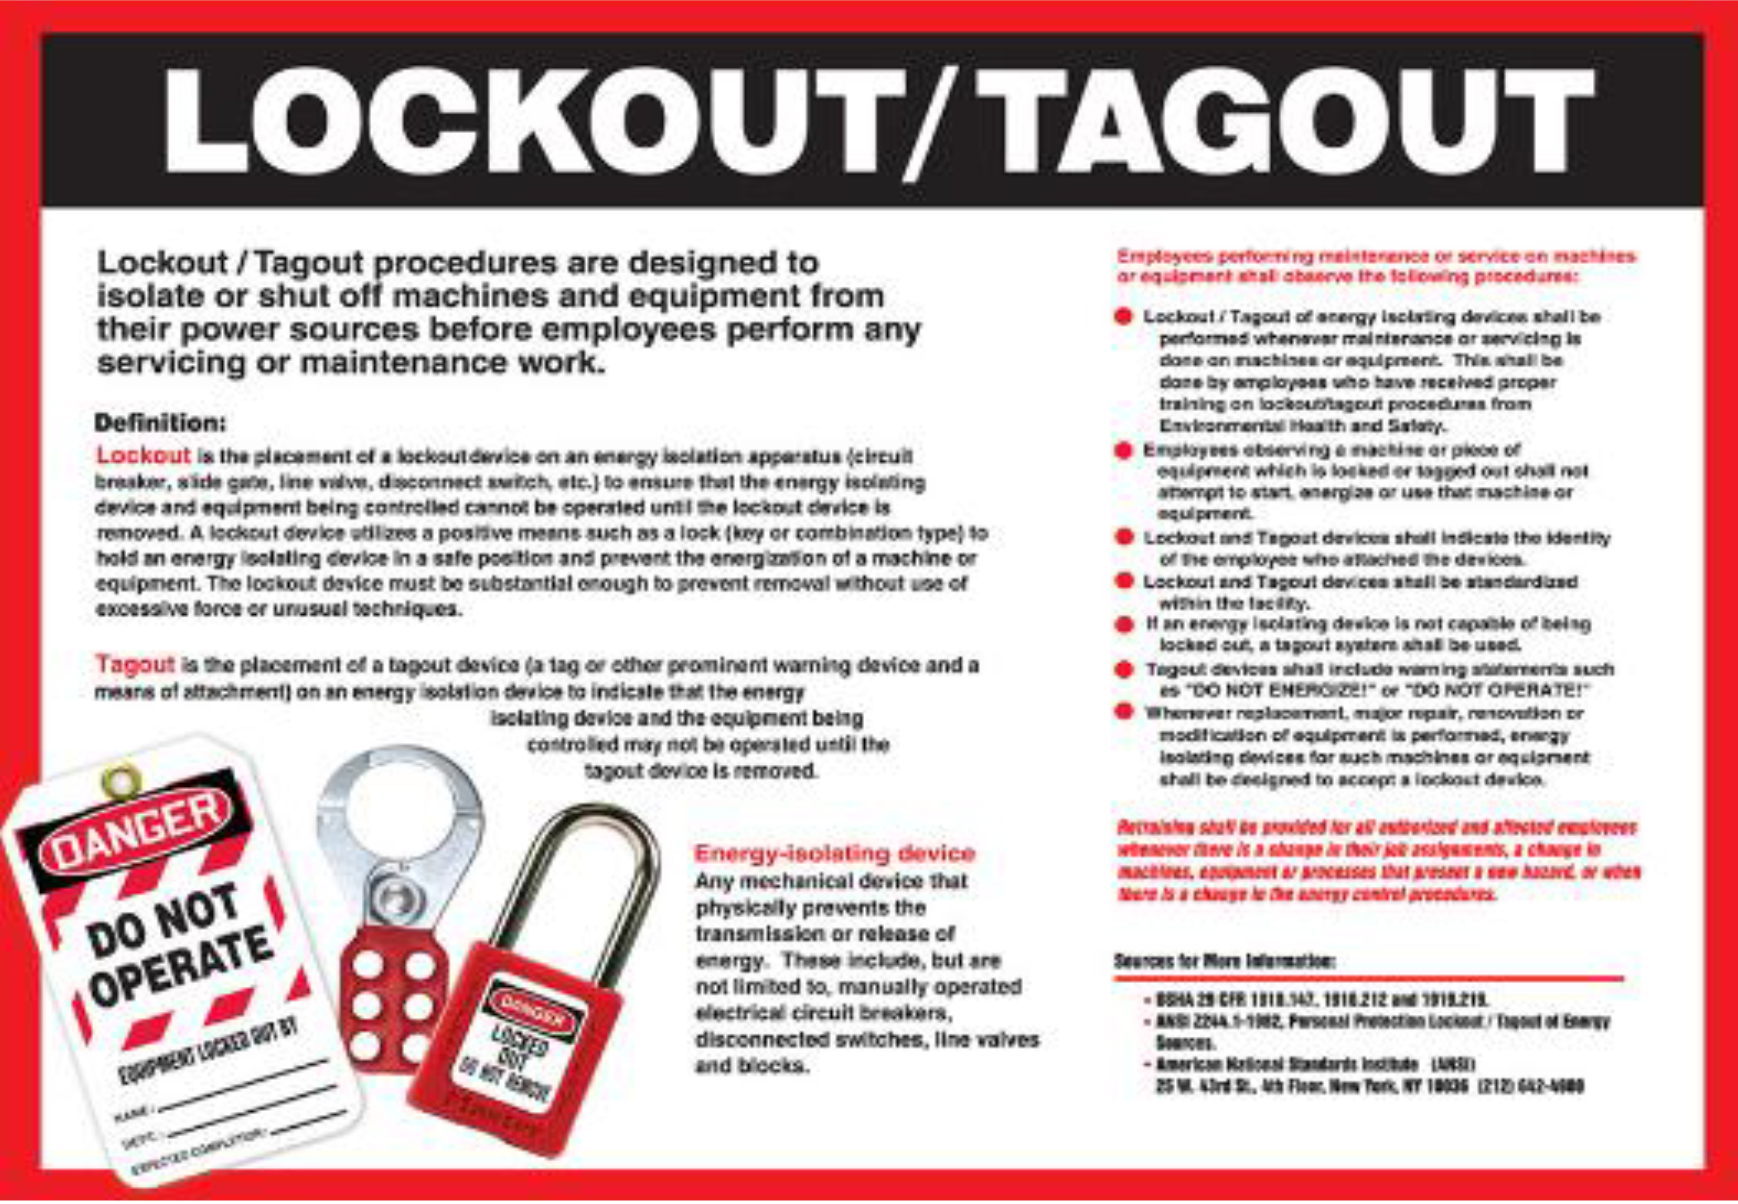
What Proper LOTO Tags and Locks Look Like
Not all locks and tags are equal. Pictures that reflect compliance use standardized, high-visibility components. Here’s what to expect in a legitimate LOTO setup:
- Locks: Durable, keyed-alike or keyed-different padlocks made of non-conductive material. Each must be assigned to a single employee.
- Tags: Bright red or orange with bold lettering. Must include:
- Employee name
- Department
- Date and time of application
- Reason for lockout
A photo from an automotive plant shows three blue locks on a group lockout box, each tagged with full details. The box itself holds the primary energy disconnect key — a practice known as group LOTO. This visual setup clarifies accountability and sequence.
Contrast this with a non-compliant image: a metal tag tied with string, faded text, and a shared lock used by multiple workers. These visuals scream procedural failure.
Real-World LOTO Mistakes Seen in Photos
Some of the most valuable pictures of lockout tagout show what not to do. Safety managers use these to train teams on common violations:
Shared Locks or Duplicate Keys
A photo from a food processing facility shows two technicians using the same lock on a mixer’s power source. This violates personal control — if one leaves, the other can’t verify if the machine is safe.
Incomplete Energy Source Identification
Another image captures a maintenance team locking the main power switch but ignoring the backup battery supply on a robotic arm. The tag says “Motor Off,” but the control system remains energized.
Missing or Illegible Tags
A grain elevator maintenance shot shows a lock with no tag. Even if the lock is valid, OSHA considers this non-compliant. Tags must be present and readable.
Temporary Overrides
One alarming photo documents a “test run” — a worker bypassing a lock with a temporary jumper, thinking it’s safe. The tag remains, but the lock is removed. This is a violation of LOTO protocol and a leading cause of accidents.
These real images underscore why visual audits matter. They expose gaps that paperwork might miss.
How to Use LOTO Pictures for Training
Visuals aren’t just for compliance checks — they’re powerful training tools. Here’s how safety teams maximize their impact:
Create “Before and After” Scenarios
Show a photo of a machine without LOTO, then the same setup with proper locks and tags. This contrast drives the point home.
Example: A packaging line photo shows an employee reaching into a conveyor belt with no safeguards. The next image shows all energy sources locked, tagged, and verified.
Annotate Key Elements
Use callouts to highlight: - Lock placement - Tag information - Energy isolation points
This turns a simple image into an instructional tool.
Simulate Group Lockout Procedures
- Group maintenance is high-risk. A well-documented photo series can show:
- Supervisor applying the group lockout device
- Each technician adding their personal lock
- Verification of zero energy before work begins
These sequences prevent miscommunication and ensure everyone follows the same flow.
Where to Find High-Quality LOTO Pictures
Not all images online are accurate or compliant. Many stock photos show outdated or incorrect practices. To find trustworthy visuals:
OSHA and NIOSH Resources

The U.S. Department of Labor publishes real-world photos in compliance guides. These are vetted and reflect current standards.
Industry Safety Manuals
Manufacturers like Schneider Electric, Brady, and Grainger include detailed LOTO diagrams and photos in product documentation.
Internal Documentation
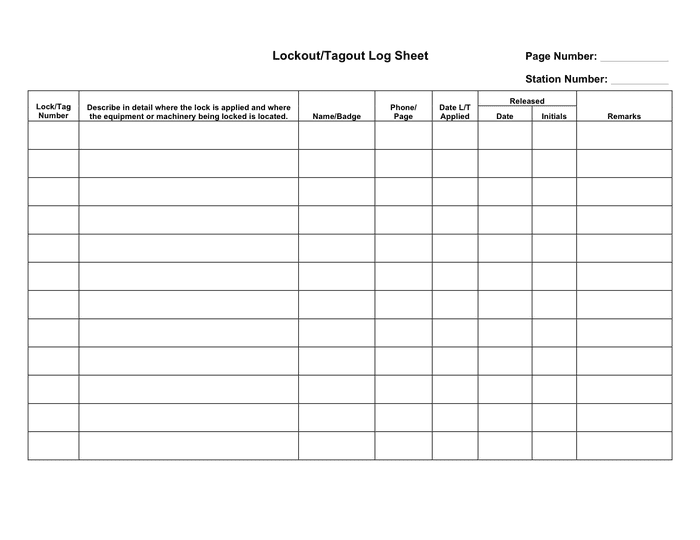
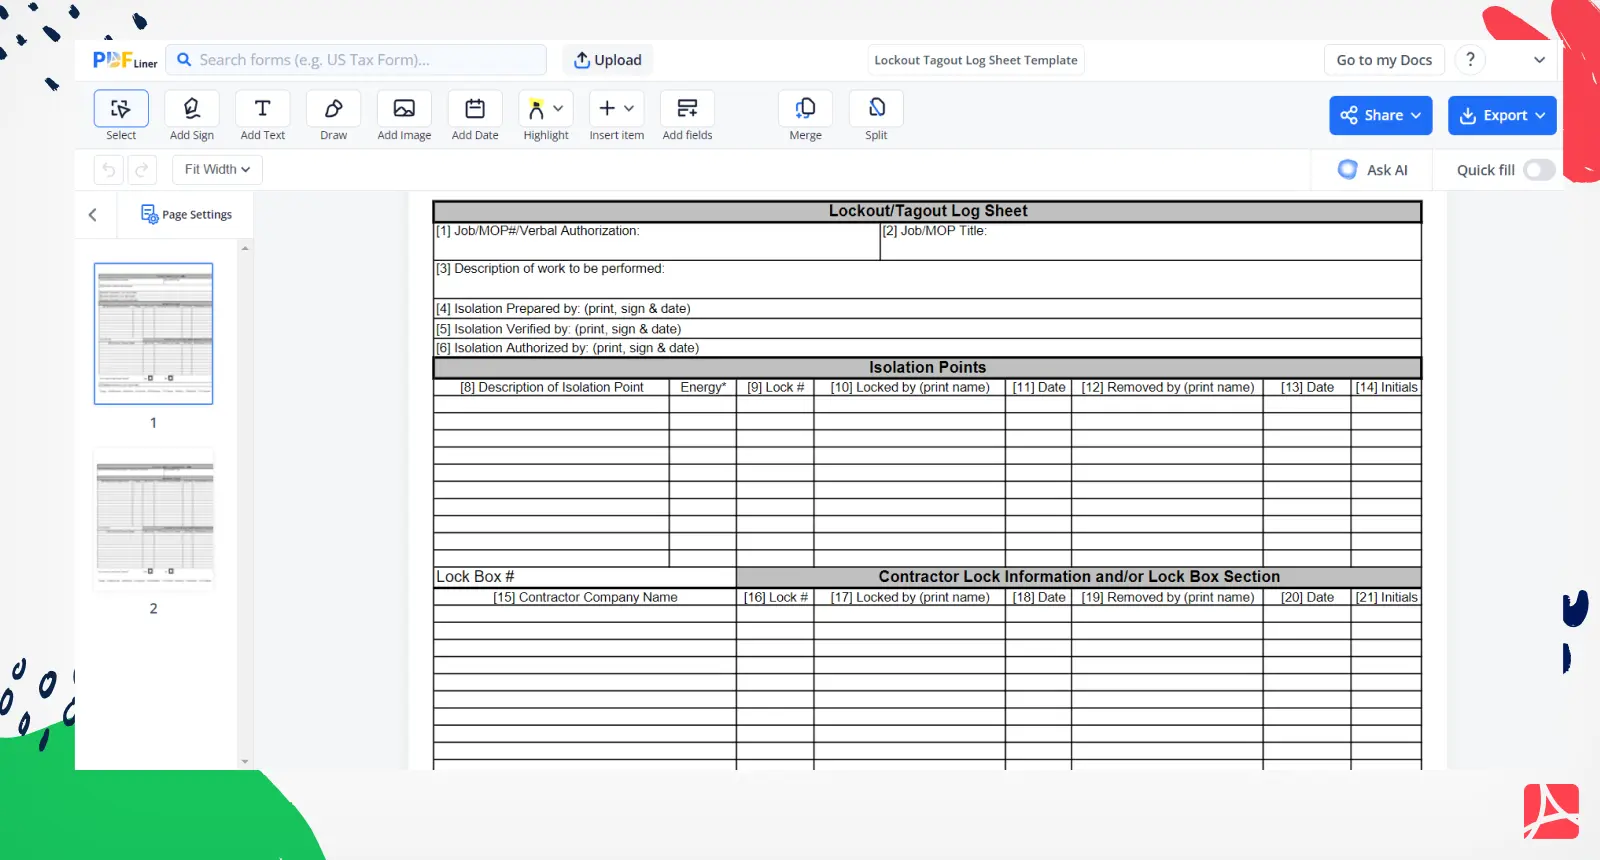
The best source? Your own facility. Take photos during safety drills or audits — with employee consent — to build a custom training library.
Avoid generic clip art. Real photos of your equipment, your tags, and your team reinforce ownership and accuracy.
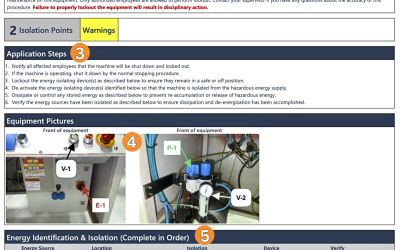
LOTO Equipment Seen in Real Photos When analyzing lockout tagout pictures, certain tools appear consistently. These are the components that make visual compliance possible:
| Equipment | Purpose | Common Visual Cues |
|---|---|---|
| Padlocks | Personal lockout | Color-coded, employee-specific, non-conductive |
| Lockout Hasps | Multi-lock application | Mounted on breakers, accepting multiple locks |
| Valve Lockouts | Block fluid/gas flow | Clamped on closed valves, with tag ports |
| Circuit Breaker Locks | Secure electrical disconnects | Fitted over toggle, preventing switch movement |
| Group Lockout Stations | Centralized control | Wall-mounted box with multiple locks and tags |
Brands like Master Lock, SPC, and 3M dominate in real-world use. Photos often show their bright red or yellow devices — chosen for high visibility in dirty environments.
Final Checklist: What Every LOTO Picture Should Show Before relying on a photo for training or audit purposes, verify it includes:
✅ Clear identification of all energy sources ✅ Personal locks applied by each worker ✅ Fully completed tags with names and reasons ✅ Physical isolation (not just tagging) ✅ Verification of zero energy (e.g., test before touch) ✅ No bypasses, overrides, or temporary fixes
If a picture misses any of these, it’s not a model of compliance — it’s a cautionary tale.
Visuals define reality in workplace safety. A single lockout tagout picture can teach more than a dozen pages of policy. But only if it’s accurate, detailed, and reflective of real conditions.
Use these images not just to train, but to audit, correct, and reinforce a culture where every lock is personal, every tag is meaningful, and every worker returns home safe.
Take action today: Review your current LOTO visuals. Replace outdated or generic photos with real, annotated images from your facility. Train with what’s real — because safety isn’t theoretical.
Frequently Asked Questions
What should a proper lockout tagout picture include? A compliant image shows all energy sources isolated with personal locks, completed tags with names and reasons, and verification of zero energy.
Are stock photos good for LOTO training? Only if they reflect real, OSHA-compliant setups. Many stock images show incorrect practices — always verify accuracy.
Can a tag alone be enough for LOTO? No. OSHA requires physical lockout. Tags are warnings, not safeguards.
How do group lockout procedures appear in photos? They show a group hasp or lockbox with multiple personal locks, each applied by individual workers, and a supervisor managing the process.
Why are personal locks important in LOTO pictures? Each lock must be controlled by one employee. Shared locks defeat accountability and violate OSHA rules.
Can photos replace LOTO training? No, but they’re essential supplements. Visuals reinforce procedures and expose common errors.
Where can I find real LOTO compliance photos? OSHA publications, equipment manuals, and internal audits are the best sources for authentic, compliant images.
FAQ
What should you look for in Lockout Tagout Pictures: Visual Guide to Safety Compliance? Focus on relevance, practical value, and how well the solution matches real user intent.
Is Lockout Tagout Pictures: Visual Guide to Safety Compliance suitable for beginners? That depends on the workflow, but a clear step-by-step approach usually makes it easier to start.
How do you compare options around Lockout Tagout Pictures: Visual Guide to Safety Compliance? Compare features, trust signals, limitations, pricing, and ease of implementation.
What mistakes should you avoid? Avoid generic choices, weak validation, and decisions based only on marketing claims.
What is the next best step? Shortlist the most relevant options, validate them quickly, and refine from real-world results.